Mosses are some of the best plants for the dry start method and can be a beautiful companion to your planted tank’s hardscape, spreading over your driftwood and rocks to give it a healthy, mature, aged-tank look.
The dry start method
The dry start method is a way of getting some aquatic plants to grow and spread roots a lot more quickly by keeping them out of water. In a little more detail, it’s giving plants access to the unlimited carbon dioxide (CO2) in the air whilst also keeping them in a moist environment to prevent drying out.
After the plants have been given a decent amount of time to settle in, the tank is flooded, filled with water, and the plants can now continue to grow in their new environment.
The main benefit of using this method is to give your plants a head start before submerging them in your water. The CO2 in the atmosphere gives you all the benefits of running a high-tech system without any of the expense. The plants will grow roots and spread or carpet in a much shorter time than if they were submerged from day 1.
Another helpful feature of this method is that it lets you grow moss or delicate plants exactly where you’d like them without having to fight water currents. Trying to plant carpet plants into a light substrate can be a nightmare, sometimes pushing in a new plant causes the neighbouring plants to loosen and float back up to the surface. By giving your plants or moss a chance to grab hold of the hardscape before water gets introduced, they’re a lot more likely to stay put.
The key drawback of using this technique is that almost every plant will experience some form of dieback after flooding. This is to be expected as the leaves adjust to going from an emersed state, out of water, to a submerged state, in the water. What this means in practice is that you’ll see your carpet lose its vibrant colours, and it might look dead for a while too. However if the roots had enough time to build a strong network, it’ll be back just as strong.
Moss hardscape tutorial
By growing your own mossy rocks with this tutorial, you’ll be able to see results in a few weeks and your patience will be rewarded.
What you’ll need
- Moss
- Rocks, wood, or something else to grow moss on
- Clear plastic container with lid, or clingfilm
- Space near a window or a light source
- (Optional) Spray bottle
How to grow moss on rocks and driftwood
Rock choice
Select some rocks or wood that you want to coat with moss. Lava rock is a great choice because of its rough texture, it allows moss and other plants to more easily hook into crevices and anchor itself.

Prepare moss
Take your moss of choice, typically a low-growing or carpeting species such as Christmas moss or Fissidens Fontanus, and pull off a few strands around 1cm in length. The moss in the image below is Fissidens Miroshaki, similar to Fissidens Fontanus but with a much shorter leaf.

Press these strands onto your hardscape in the areas you’d like to be mossy first. You don’t need to completely cover the surface as it will naturally grow and spread out, but try to get enough to cover your hardscape of choice with around a couple of centimeters between each strand.
You might find it easier to slightly dampen the surface before pressing the moss onto it.

Container moisture
Carefully move your rocks into your plastic container and if you have a spray bottle, give them a good misting.
Once they’re in, add a small amount of water, up to just below the lowest moss strand, so that the porous nature of the lava rock can help to keep the rock surface moist, promoting the moss growth.
Once misted and extra water has been added, put the lid on the container, or cover with clingfilm to retain humidity.

Patience
Move the covered container to a bright area, such as on a windowsill, to give the moss as much growth potential as possible. Within reason, most mosses will grow faster when given access to more light.
Every few days you should remove the lid or fold back the clingfilm for a few minutes, up to an hour, to prevent mold invading your container.
Change the water in the bottom of the container every week or so to try and slow down algae growth. You can also use non-dechlorinated tap water here to further limit growth of any algae, but either tap or treated water will work fine.
Last steps
Before adding to a tank with livestock already in, completely submerge the rocks in dechlorinated water, or old tank water for a few hours. This will tell you that the moss has attached well enough to the rocks before introducing any water movement, and prevents unwanted dirt remaining on the rocks or moss.
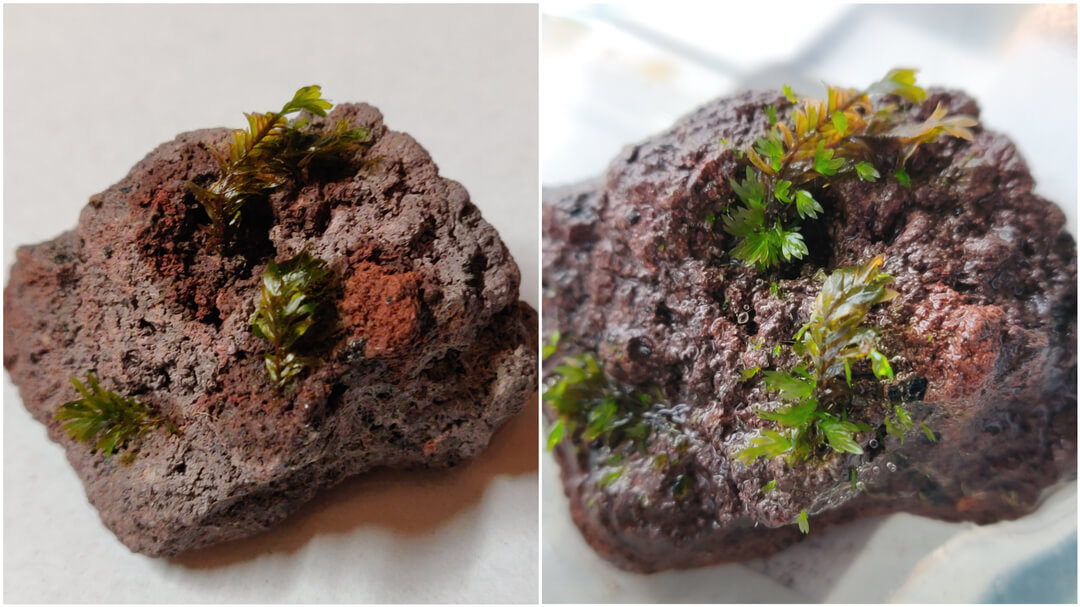
Progress
This is an example of progress growing Fissidens Miroshaki on a lava rock for just under 6 weeks.
At day 8 most of the leaf had lost its vibrant green colour and it died back to a brown shadow of its former self.
At day 19, or almost three weeks in, it had regained most of its green colour and had the start of some new, bright green shoots from the original stem.
At day 39, around the 6 week mark, lots of new shoots had appeared and spread over the surface. At this point the rock is ready to be added to a setup tank, or it could be left to try and get more ground cover.
